[TOC]
今天主要就来说说怎么不使用IDE的向导搭建一个
eureka,还有注册中心的基本配置
创建一个简单的 maven 项目

添加 eureka-server 依赖
eureka服务端需要添加spring-cloud-starter-eureka-server依赖
1
2
3
4
5
6
7
8
9
10
11
12
13
14
15
16
17
18
19
20
21
22
23
24
25
26
27
28
29
30
31
32
33
34
35
36
37
38
39
40
41
42
43
44
45
46
47
48
49
50
51
52
<?xml version="1.0" encoding="UTF-8"?>
<project xmlns="http://maven.apache.org/POM/4.0.0"
         xmlns:xsi="http://www.w3.org/2001/XMLSchema-instance"
         xsi:schemaLocation="http://maven.apache.org/POM/4.0.0 http://maven.apache.org/xsd/maven-4.0.0.xsd">
    <modelVersion>4.0.0</modelVersion>

    <groupId>com.feng.cloud</groupId>
    <artifactId>eureka-server</artifactId>
    <version>1.0-SNAPSHOT</version>

    <dependencyManagement>
        <dependencies>
            <!--spring cloud依赖管理-->
            <dependency>
                <groupId>org.springframework.cloud</groupId>
                <artifactId>spring-cloud-dependencies</artifactId>
                <version>Dalston.SR1</version>
                <type>pom</type>
                <scope>import</scope>
            </dependency>
            <!--spring boot依赖管理-->
            <dependency>
                <groupId>org.springframework.boot</groupId>
                <artifactId>spring-boot-dependencies</artifactId>
                <version>1.5.9.RELEASE</version>
                <type>pom</type>
                <scope>import</scope>
            </dependency>
        </dependencies>
    </dependencyManagement>

    <dependencies>
        <!--eureka-server服务端 -->
        <dependency>
            <groupId>org.springframework.cloud</groupId>
            <artifactId>spring-cloud-starter-eureka-server</artifactId>
        </dependency>
    </dependencies>

    <build>
        <plugins>
            <plugin>
                <groupId>org.springframework.boot</groupId>
                <artifactId>spring-boot-maven-plugin</artifactId>
                <configuration>
                    <executable>true</executable>
                </configuration>
            </plugin>
        </plugins>
    </build>

</project>
创建启动类
启动类中最主要的部分是添加
@EnableEurekaServer说明这是注册中心
1
2
3
4
5
6
7
8
9
10
11
12
13
14
15
16
17
18
19
package com.feng.eureka;

import org.springframework.boot.SpringApplication;
import org.springframework.boot.autoconfigure.SpringBootApplication;
import org.springframework.cloud.netflix.eureka.server.EnableEurekaServer;

/**
 * @author Lee
 */
@EnableEurekaServer
@SpringBootApplication
public class EurekaServerApplication {

    public static void main(String[] args) {
        SpringApplication.run(EurekaServerApplication.class,args);
    }

}
创建配置文件 bootstrap.yml
配置的作用会用注释说明
1
2
3
4
5
6
7
8
9
10
11
12
13
14
15
16
17
server:
  port: 7000

spring:
  application:
    name: eureka-server
eureka:
  instance:
    hostname: ${spring.cloud.client.ipAddress} #eureka服务端的实例名称
  client:
    register-with-eureka: false #不向注册中心注册自己,设置为false
    fetch-registry: false #false表示自己端就是注册中心,我的职责就是维护服务实例,并不需要去检索服务
    service-url:
      defaultZone: http://${eureka.instance.hostname}:${server.port}/eureka/ #被客户端注册的地址
  server:
    enable-self-preservation: false #是否启动自我保护机制,测试环境应该关闭自我保护机制,服务失效90秒被自动移除。生产环境应该开启自我保护机制,即使服务失效
    eviction-interval-timer-in-ms: 3000 #检查失效时间
将服务注册到 eureka
接下来我们创建一个新的
spring boot项目,用于注册到注册中心若想将服务注册到
eureka只需要在配置中添加如下配置
1
2
3
4
eureka:
  client:
    service-url:
      defaultZone: http://localhost:7000/eureka/
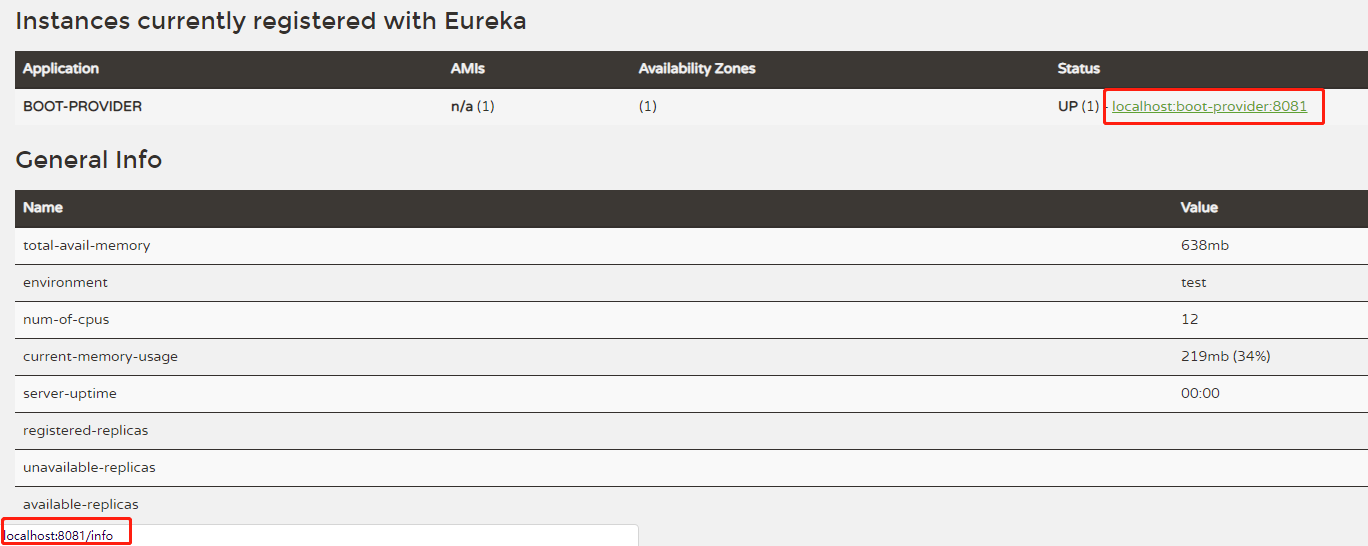
修改注册到注册中心实例的显示地址和实例名称
如果客户端使用默认的实例名字,那么实例的名字就是这个样子的,而且当鼠标放到上面的时候右下角显示的地址是
localhost,那么怎么将localhost改为服务部署的IP地址,并且将注册到注册中心的实例名称自定义呢。
将客户端的配置添加
eureka.instance.prefer-ip-address属性
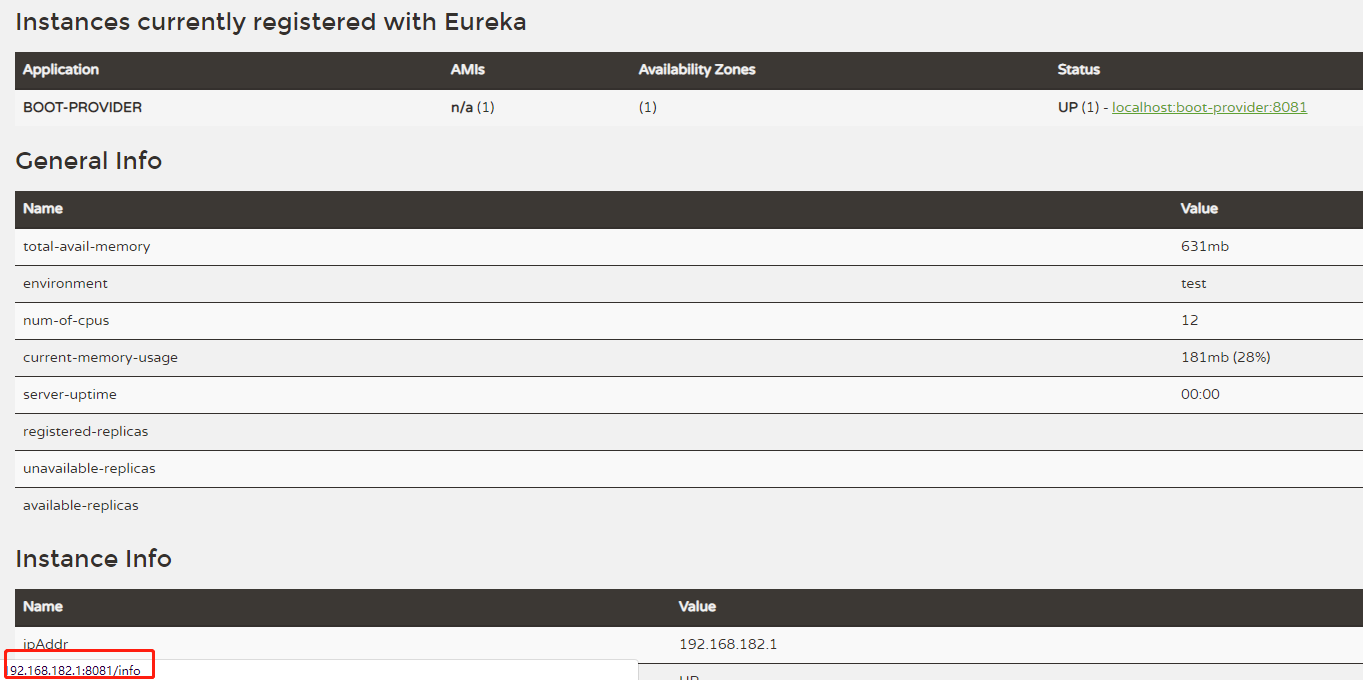
接下来添加配置实例id
instance-id,显示自定义实例名称
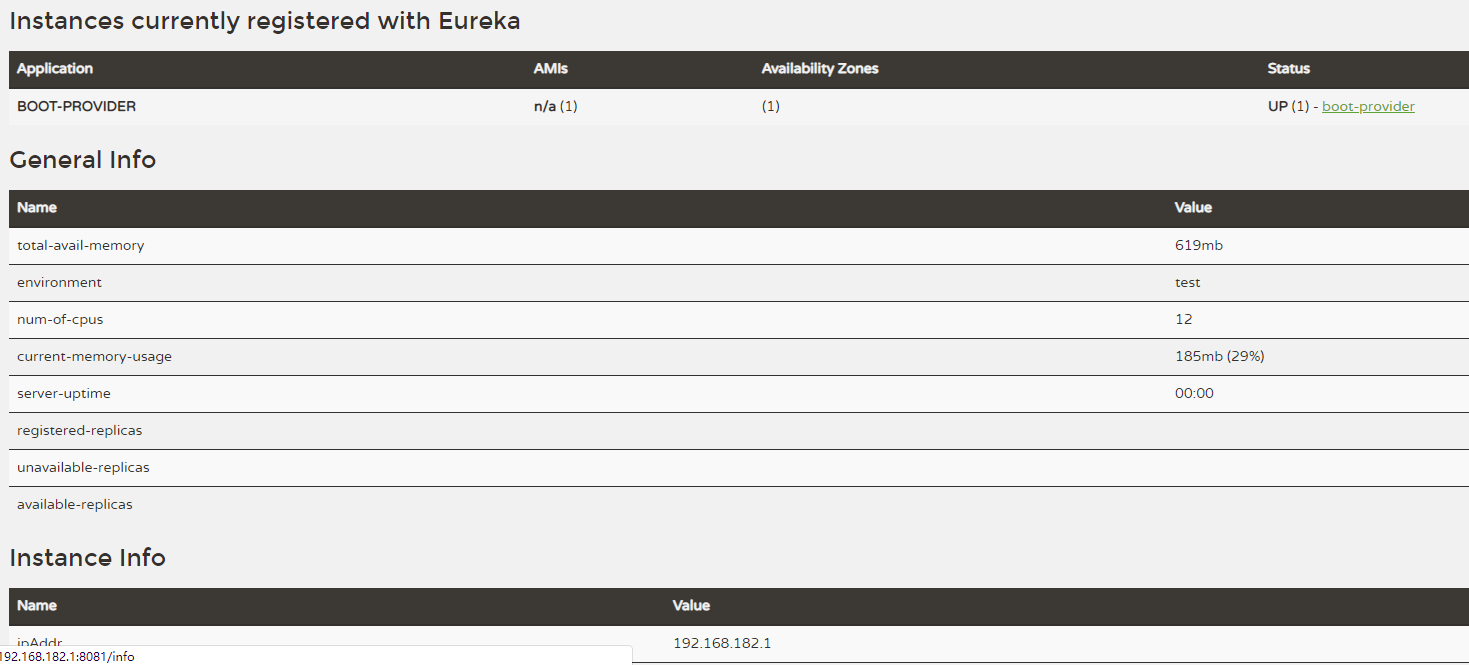
发现图中客户端实例的名称变成了我们自定义的名称
boot-provider
修改客户端实例的 info 信息
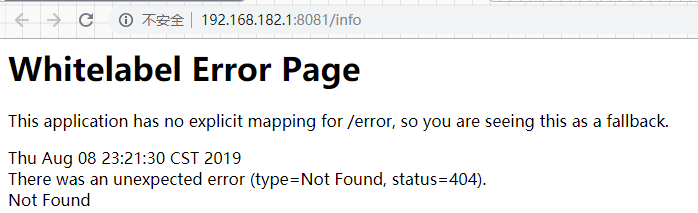
当我们点击实例名称的超链接想要查看客户端实例的信息时,发现响应的时404页面

首先客户端添加依赖
spring-boot-starter-actuator服务健康监控,关于健康控监控多余的东西在这里就不作 介绍了.添加
maven的resource插件
1
2
3
4
        <dependency>
            <groupId>org.springframework.boot</groupId>
            <artifactId>spring-boot-starter-actuator</artifactId>
        </dependency>
1
2
3
4
5
6
7
8
9
10
            <plugin>
                <groupId>org.apache.maven.plugins</groupId>
                <artifactId>maven-resources-plugin</artifactId>
                <configuration>
                    <delimiters>
                        <!-- 表示取resources中以$*$的信息被解析 -->
                        <delimiter>$</delimiter>
                    </delimiters>
                </configuration>
            </plugin>
配置
info客户端实例的info信息可以自定义一些键值对.由于上面配置了
maven的resource插件,$*$的属性将会被解析
1
2
3
4
5
6
info:
  app.name: boot-provider
  company.name: spring-eureka
  author: feng
  build.artifactId: $project.artifactId$
  buid.version: $project.version$

这些都配置完发现点可以显示
info的信息了
eureka 集群配置
我这里为了搭建集群环境,重新建了三个注册中心项目

为了更接近真实环境,我将
hosts文件做下修改,不同的注册中心分别对应不同的域名
127.0.0.1       eureka7001server.com
127.0.0.1       eureka7002server.com
127.0.0.1       eureka7003server.com
eureka-server-7001配置```yml
eureka 端口号
server: port: 7001
服务名称
spring: application: name: eureka-server
eureka: instance: hostname: ${spring.cloud.client.ipAddress} #eureka服务端的实例名称 client: register-with-eureka: false #false表示不向注册中心注册自己。 fetch-registry: false #false表示自己端就是注册中心,我的职责就是维护服务实例,并不需要去检索服务 service-url: #注册中心的地址 defaultZone: http://eureka7002server.com:7002/eureka/,http://eureka7003server.com:7003/eureka/ server: enable-self-preservation: false #是否启动自我保护机制
1
2
3
4
5
6
7
8
9
10
11
12
13
14
15
16
17
18
19
20
21

> `eureka-server-7002` 配置
>
```yml
server:
  port: 7002

spring:
  application:
    name: eureka-server

eureka:
  instance:
    hostname: ${spring.cloud.client.ipAddress} #eureka服务端的实例名称
  client:
    register-with-eureka: false #false表示不向注册中心注册自己。
    fetch-registry: false #false表示自己端就是注册中心,我的职责就是维护服务实例,并不需要去检索服务
    service-url:
      defaultZone: http://eureka7001server.com:7001/eureka/,http://eureka7003server.com:7003/eureka/
  server:
    enable-self-preservation: false
eureka-server-7003配置
1
2
3
4
5
6
7
8
9
10
11
12
13
14
15
16
17
server:
  port: 7003

spring:
  application:
    name: eureka-server

eureka:
  instance:
    hostname: ${spring.cloud.client.ipAddress} #eureka服务端的实例名称
  client:
    register-with-eureka: false #false表示不向注册中心注册自己。
    fetch-registry: false #false表示自己端就是注册中心,我的职责就是维护服务实例,并不需要去检索服务
    service-url:
      defaultZone: http://eureka7002server.com:7002/eureka/,http://eureka7001server.com:7001/eureka/
  server:
    enable-self-preservation: false
客户端实例注册
```yml eureka: client: service-url: defaultZone: http://eureka7001server.com:7001/eureka/,http://eureka7002server.com:7002/eureka/,http://eureka7003server.com:7003/eureka/
```
最终效果
由于篇幅原因,我这里只放出
eureka-server-7001的截图

我们发现最终注册中心会互相注册